On Thursday, 16th October 2014, the GTMA will once again host its popular Make Measurement Matter road show. This year the event will be held in the DW Stadium and Fitness Lounge at Wigan Athletic Football Club’s DW Stadium, a superb facility offering a flexible multi-function venue in the ground’s South Stand with 800 m2 of exhibition floor space.
Registration is now open at www.makemeasurementmatter.co.uk
A key focus of the event will be over 40 of the top UK inspection and metrology companies that will be exhibiting, along with extensive networking opportunities in a relaxed environment. Demonstrating the very latest technology, these metrology companies are active participants in creating successful engineering solutions for the current and future demands of all industry sectors. Visitors will also benefit from free parking and free refreshments.
Now in its eighth successful year, MMM 2014 is a focal point for a technology transfer from the science of measurement into the most demanding manufacturing environments.: “With keynote speakers from industry-leading ‘blue chip’ manufacturing companies and an interesting transfer of measurement technology into the Police service, MMM 2014 will provide an opportunity for attendees to learn more about the very latest measurement and inspection technologies and services available. This knowledge could provide a vital competitive edge,” says association chief executive, Julia Moore.
Keynote Speakers include John Rusted, Humberside Police, Forensic Collision Investigation, and his presentation is: ‘The adaptation and adoption of HDS technology for use in collision investigation’. National Product Verification Programme Leader at the NPL, Phil Cooper, will present: ‘Product verification’. Simon Gough-Rundle, Group Assistant Chief Metrologist and Chief Metrologist for Aerospace Supply Chain at Rolls-Royce, is presenting: ‘Development of Measurement and Inspection within the global Aerospace Supply Chain through generation of industry minimum standards, collaborative working and audit programmes’.
One of the longest serving senior collision investigators within the Police service, John Rusted is a former chairman of the Institute of Traffic Investigators and has specialised in road collision investigation and reconstruction at Humberside Police since 1985. As a consequence he has dealt with and reconstructed a great number of fatal road traffic incidents, and has also been responsible for investigating and reconstructing murders and manslaughters during that time. He will be speaking about the benefits of the wider adoption of HDS technology within the UK’s collision investigation community.
He says: “My team of six investigators were pioneers in the use of 3D HDS technology for road related incidents, being one of the two forces that the Highways Agency and Department of Transport selected to participate in a national project. I now head up the UK element of the European CrashCube project.”
Phil Cooper from the National Physics Laboratory will focus on product verification. An important process requirement for manufacturers aiming to provide complete assurance that components and products are manufactured according to the original design specification, thereby reducing product failure, poor performance, waste and customer dissatisfaction.
The purpose of Simon Gough-Rundle’s work is to raise the standard of measurement and inspection compliance and performance across the whole supply chain. He says: “The current approach taken by many aerospace primes has realised many benefits, however the model used cannot be scaled to access the full potential across a global supply chain. The proposed new approach is to use collaborative working to establish a set of minimum standards for measurement and inspection across the aerospace industry. The compliance to the agreed minimum standard will be raised using an industry wide audit programme.”
The day will be opened and chaired by Andy Morris, Laboratory Manager, NPL at the University of Huddersfield. He has experienced measurement issues in many different industry sectors, from nuclear through underwater acoustics, electrical, dimensional, nano-metrology and many others. At NPL, he specialises in working with manufacturers to with the introduction of new measurement technologies.
Places at this popular annual event are limited so book early to avoid disappointment. Please register on line at www.makemeasurementmatter.co.uk today.
What’s on show:
Bowers Group (Stand 41) will be exhibiting a wide selection of the company’s comprehensive range of measuring instruments, including several recently launched products, at the Make Measurement Matter Roadshow.
Developed as a response to frequent requests for a gauging system that could accurately measure small bores, Bowers will be demonstrating the ingenious 2-point MicroGauge bore gauging system. Designed specifically for the accurate measurement of bores from 1 to 6 mm, the extremely compact gauge features a completely new integral digital readout. The user friendly gauge is easy to use; the action of locating the gauge’s hard-chromed, spherical contact points into the bore to be measured causes a mechanical force to be transferred to the gauge’s digital readout unit. This action instantaneously causes the bore’s size to be displayed on the unit’s high-visibility LCD readout. Moreover, as the MicroGauge benefits from 2-point localised contact with the bore to be measured, further bore features, such as ovality, taper and barrelling can also be evaluated.
Delcam (Stand 39) will demonstrate the 2014 release of its PowerINSPECT inspection software, which will feature a new interface with new icons that will make the software more intuitive and even easier to use. Other enhancements in the new version include the ability to create compound items and to speed up and simplify repetitive measurements.
The new interface has been developed to further improve the ease of use that has been central to PowerINSPECT becoming the world’s leading hardware-independent inspection software. Over the last few releases, the software has seen a significant increase in the range of measurements that it can make. The software can now be used to take all types of simple measurements and to inspect a growing variety of geometric features, as well as offering more tools for analysing complex 3D surfaces.
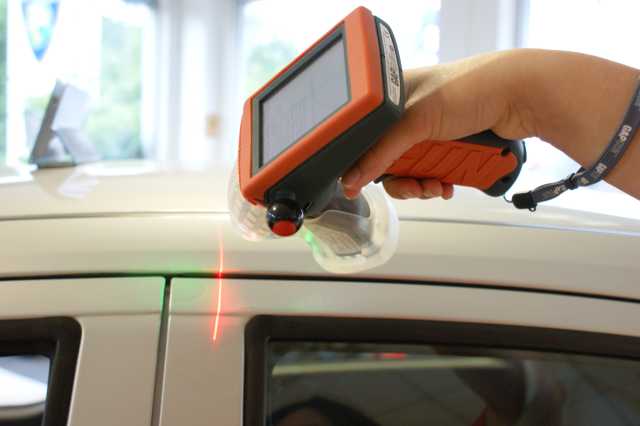
Third Dimension (Stand 38) will launch the GapGun Pro, its flagship handheld model which will join the company’s market leading range of laser measurement devices, a unique range of flexible and ergonomic profile measurement systems that use optical triangulation to measure gaps, shapes and forms incredibly accurately.
GapGun Pro takes a large evolutionary step from its predecessor, GapGun MX+, with focus on greatly improved speed, ease of use, portability and ruggedness. New and improved functionality includes ultra-fast processing capability, fully integrated Wi-Fi and a high definition colour touch screen.
The new MSE 1000 modular connection system has been announced by Heidenhain (Stand 29), the world-leading supplier of angular, linear and rotary encoders, digital readouts and CNC systems, as a versatile and cost-effective solution to a wide range of simple and complex analogue and digital measurement applications.
Enabling fast and flexible Ethernet-to-PC connection for up to 250 axes/data channels, MSE 1000 can be installed as a series of modules for configuration to specific needs covering, for example, temperature and pressure, sorting switches, warning lamps and PLCs.
The modules allow connection of incremental, absolute and analogue measuring devices, the output of switch signals and communication over a diverse range of interfaces. .
MSE 1000 modules can be easily mounted on a standard rail or mounting bracket, and each module plugs into the next and is fixed with a lock which also connects the internal bus and the power supply. MSE 1000 is also suitable for 19 inch rack housing.
Optimax Imaging Inspection & Measurement is an independent, specialist provider of optical inspection and non-contact metrology equipment. Product ranges encompass video and optical microscopes, non-contact measuring instruments, endoscopes, fibrescopes, videoscopes and 3 dimensional surface profiling equipment for use in industrial production processes and quality control.
Showcasing at MMM, the latest technological innovations in optical profile projectors and video measuring systems from Starrett Precision Optical; 3D surface characterisation and optical profiling from Alicona; and leading edge inspection microscopes from the Vision Engineering award winning range.
Optimax also offer existing and new instrument users a high level of support for scheduled service and calibration work, with advantageous maintenance contracts available in addition to technical support, repairs, spares and upgrades.
Bring your samples/parts along (Stand 22) for a live, no obligation demonstration of the equipment on offer.
IndySoft (Stand 21) will be demonstrating its largest ever range of calibration software and asset management solutions, including several recently launched products.
IndySoft believes that the purchase of a calibration or tooling asset management system is one of the most important decisions a company can make in relation to the efficient administration of its quality programme. IndySoft’s feature packed, yet easy to use software is designed to complement and augment users’ processes, not dictate how they run their business. Staff take the time to understand the requirements of all potential users, then by harnessing the company’s collective experience, suggest the exact mix of cost-effective products and services to meet long-term efficiency goals.
The MMM Roadshow gives potential users a chance to talk to experienced IndySoft personnel about their business and to discover the range of major advantages that can be gained by using IndySoft products.
Physical Digital (Stand 19) has enjoyed another year of growth across all areas of its business. With on new personnel taken the company can ensure a consistently responsive approach to its expanding customer base in the UK, Europe and beyond.
This year the company successfully bid for a grant from Grow:Offshore Wind for new scanning equipment. Now, it offers the industry-leading GOM TRITOP Photogrammetry system (Optical 3D Co-ordinate Measuring Machine), to support its high quality data collection, reverse engineering and in-house design.
Staff were delighted by the excellent feedback from customers in a recent survey, who unanimously endorse the high quality data supplied by the company. Physical Digital remains the go-to company for engineering directors and project managers requiring accurate 3D data they can trust.


Leave a Reply