Based in Ufa, Russia, Technopark Aviation Technologies, a provider of educational and scientific research and engineering services, worked closely with the country’s largest provider of gas turbine engines who design, manufacture and service high performance gas turbine engines for both fixed and rotary wing aircraft and gas and oil producing sectors.
One of Technopark’s customers wanted to increase the accuracy and efficiency of its bladed disk milling process. The complex high curvature surfaces of bladed disks used in gas turbine engines make them challenging components to manufacture.
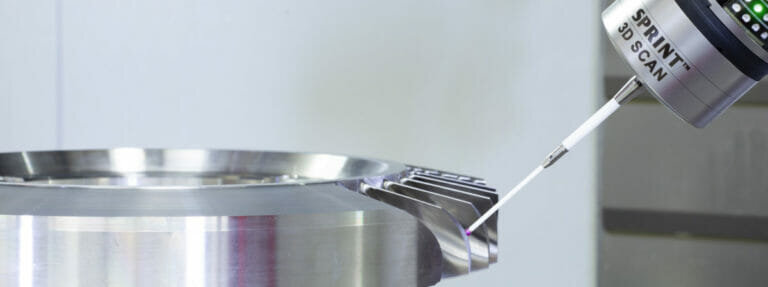
To overcome this challenge, Technopark applied Renishaw’s OSP60 on-machine 3D scanning probe with SPRINT™ technology and Productivity+™ Scanning Suite.
Background
In a precision mechanical assembly comprising compressor, combustor and turbine, bladed disks play an important role in minimising drag and optimising airflow in the engine and the amount of thrust it produces.
Introduced in the mid-1980s, a bladed disk is a single component comprising a rotor disk and multiple curved blades. By removing the need to attach separate blades to a bare rotor, bladed disks have helped transform turbine design, substantially reducing component counts, increasing reliability and maximising engine efficiency.
Bladed disks are machined from very hard high-value metal, typically titanium or nickel-based alloys. Milling is by far the most important machining process during their manufacture, and due to the bladed disk’s high curvature surfaces, multi-axis CNC machine tools and advanced software are required.
Bladed disk milling usually involves rough slot-milling and semi-finishing to create a near net component, followed by fine milling to arrive at the finished high-precision blade and rotor surfaces.
Challenges
The The high complexity of the bladed disks and the stringent manufacturing precision they demanded meant the fine milling process for a wide range of different bladed disks was a labour-intensive and increasingly costly process.
Despite using a touch-trigger probe for on-machine disk measurement, each workpiece needed to be removed from the CNC machine after milling for offline measurement and inspection, and then remounted for any further machining. This process needed to be repeated several times and was subject to human error.
The company deduced that the off-machine inspection and milling process was accounting for anywhere between 30% and 60% of the total labour cost involved in bladed disk production. In addition, statistical analysis of the dimensional deviation in blades (after leading and trailing edge machining) identified the presence of errors.
Deviations in blade cross section were observed as: residual allowance fluctuation ±0.064 mm, offset from nominal profile 0.082 mm. Deviations in the longitudinal section were similar: residual allowance fluctuation ±0.082 mm, offset from nominal profile 0.111 mm.
The main reasons for deviations arising during edge machining were concluded to be: kinematic errors of the machine during five-axis operation; elastic deformation of the blade during the cutting process due to its low rigidity; and elastic deformation of the tooling during metal cutting.
“The large number of operator interventions necessary for this process simply increased the risk of irreparable rejects due to human error. There was an obvious need to develop a fundamentally new solution for faster, high-precision bladed disk milling.”
Developing a CNC machining process for the milling of bladed disks included the following requirements:
- Semi-finishing using a parameterised control program
- On-machine workpiece inspection
- Correction of the parameterised control program based on inspection results
- Fine milling of the workpiece using the corrected parameterised control program.
Solution
Technopark was selected to develop and implement the process controls needed. Semen Starovoytov, Candidate of Technical Science and Head of the Innovation Department at Technopark said. “We have worked successfully with Renishaw for many years, equipping machines with Renishaw touch-trigger probes to achieve flawless measurement accuracy.”
“In the case of the application a clear need arose for software development based on a scanning probe, so we approached our partners from Renishaw. Their SPRINT 3D scanning measurement technology for machine tools provided all the technical capabilities we required.”
Result
The introduction of Productivity+ and the OSP60 probe has had a significant impact on the bladed disk manufacturing process in terms of machining accuracy, speed and labour costs.
The 3D scanning and measurement of bladed disks on the machine tool and at very high speed has generated exceptional time savings in the production process resulting in a marked increase in CNC machine productivity.
With respect to bladed disk milling accuracy, a comparison of the respective deviations in bladed disk cross section and longitudinal cross section after edge machining showed a dramatic improvement, from 0.082 mm and 0.111 mm with the former process to 1 µm and 28 µm on the new.
On the implications for machine manning, Starovoytov said, “The control system’s execution mode ensures automatic adjustment of the CNC control program based on the 3D blade scanning data delivered by the OSP60 probe. This means there is no longer a need for an engineer to be at the machine constantly.”
He concluded, “The combination of SPRINT 3D scanning technology and Productivity+ CNC software means that even the most minor deviations in bladed disk form are always identified in real time. With touch-trigger systems these would have gone unnoticed.”
“The results we have gained from the investment have far exceeded our expectations. Our accuracy in fine milling of bladed disks is more than four times better and the related labour costs have been halved.”
SPRINT™ technology
The OSP60 on-machine 3D scanning probe is equipped with Renishaw’s unique SPRINT technology.
As the probe stylus tip precisely follows a bladed disk surface, it allows high-resolution stylus deflection data to be recorded with exceptional accuracy, registering all sub-micron X, Y and Z movements at the ultra-responsive stylus tip.
The OSP60 sends a thousand XYZ tip centre data points to the OMM-S receiver every second using a high-speed noise-resistant optical transmission link. Advanced algorithms then process the probe deflection data together with machine tool position encoder data to produce accurate bladed disk
surface data, which is used to calculate precise feature position, size and form.
Productivity+™ technology
Using the Productivity+ CNC plug-in, scanning speeds of up to 15,000 mm/min can be achieved, providing on-machine measurement sometimes 6 times faster than traditional touch-trigger systems. Bladed disks are scanned on the machine tool and the requirement to remove workpieces during processing is eliminated.
The software displays high accuracy measurement results on-screen in real-time and uses them to automatically adjust machine tool settings for the ensuing fine milling process. Measurement reports can be exported to file for analysis or quality assurance purposes.
Bladed disk inspection programs can be generated quickly and easily from solid model geometry using existing off-machine graphical programming tools, while the interactive front end of Productivity+ is used for editing and running probe inspection routines with easy-to-understand graphical screens, instead of complex NC codes to display the program to the user.
For further information visit www.renishaw.com/technopark


