While the measurement of super smooth surfaces typically requires the use of optical metrology tools, it is important to realize that not all optical solutions are the same. The metrology option chosen for such surfaces must satisfy the need for extreme accuracy, precision, and repeatability if it is to support satisfactory quality and process control.
Eric Felkel, Product Manager (Optical Profilers), Zygo Corporation
Super smooth surfaces are now common in many optical and micro-electronic applications. Product innovation is being driven in such sectors through the use of surfaces to manipulate functional performance. The requirement to control, and therefore — by definition — measure surface features has become more and more important in a world where there is a drive towards precision engineering and miniaturization.
As surface texture requirements for advanced manufacturing processes trend towards sub-nanometer levels, a host of unique challenges for metrology tools arise in environments where the demand is for highly efficient quality and process control.
Until recently, the standard method for such measurements was the use of contact tools such as stylus profilometers or atomic force microscopes (AFMs). These techniques are known to be slow, prone to damaging surfaces, require substantial operator training, and have relatively low measurement point density.
Because of this, non-contact optical metrology tools are now the go-to option for measurement of surface roughness of super smooth surfaces. However, it is important to realize that not all optical technologies provide the level of repeatability and precision required, and technology and supplier selection must be carefully considered before decisions are made.
NON-CONTACT OPTICAL METROLOGY TECHNIQUES
Optical techniques used for surface measurements include confocal microscopy, focus variation, and coherence scanning interferometry (CSI).
Confocal microscopy.
Laser scanning and white light confocal microscopy work by observing a reflected light signal though a small aperture, such that only when the imaging system is in focus, is the light received at the detector. This is useful for quickly producing 3D images of rough or highly sloped surfaces, but it is not as effective on smooth and featureless samples. The precision is also dependent on the magnification of the microscope objective, which makes scanning confocal only really practical for smooth surfaces at very high magnification.
Focus Variation. This technique is similar to confocal microscopy in that its precision is also dependent on the objective magnification used. In Focus variation the principle of operation is based on the projection of a beam of light on a relatively small area of the surface of the assessed object. An analysis of the depth of field defines the surface height. To do this, focus variation analyses a collection of data points at the detector in order to determine a single height position, which means that there is an inherent loss of lateral fidelity using this method. Despite once again being a relatively versatile technique, focus variation cannot be used if the surface being measured does not give structure in the image, so it cannot be used for very smooth and featureless wafers or glass.
Coherence Scanning Interferometry. CSI uses the principle of optical interference to compare a part that needs to be measured to a “perfect” reference. The illumination is divided into two paths where one travels to the reference surface, and the other travels to the test surface. The reflections from these two surfaces combine at a detector where they interfere with each other, and a pattern of light and dark intensities is created. That interference pattern represents the surface topography of the test surface. Because CSI uses white light, the interference signal is localized, which means that it only happens when the test and reference legs are the same length. CSI “scans” the objective through focus, exploring the different heights in the sample. Because of this scanning and localized interference, surfaces that are rough or structured with steps or other discontinuities can be measured, as well as those that are exceptionally smooth.
CSI presents a number of advantages over confocal and confocal-like non-contact technologies:
- It is very precise with nanometer or sub-nanometer height precision at all magnifications
- It is a fast, consistent measurement, typically producing ~1.9 million pixels in just a few seconds – again, at all magnifications
- CSI can be used on super-smooth or optically transparent surfaces, as well as surfaces with transparent optical films.
These advantages combine to provide exceptional application versatility as the same instrument can be used for both with Because of this, CSI is also appropriate for low magnification, large field-of-view imaging (< 5x) and higher magnification texture metrology with the same sub-nanometer level performance.

PSD with well aligned slice (a) pp
BEST-IN-CLASS CSI-BASED TOOLS
When specifying a 3D optical metrology solution, it is important to appreciate that not all CSI-based tools are the same, and users should look for solutions characterized by their speed, superior Z-resolution, wider magnification, and the ability to measure super-smooth to rough surfaces.
Zygo Corporation, a leading global manufacturer of electronic instruments and electromechanical devices, has — for example — developed CSI-based solutions that offer hundreds of reportable parameters when measuring surface structure and texture across varying surface scales, including areal surface roughness to ISO 25178 standards, and 2D profile parameters compliant to ISO 4287/4288.
ZYGO’s CSI-based 3D optical profilers offer users precise, accurate, and repeatable metrology tools available for the measurement of super smooth surfaces. The company’s newest range of 3D profilers incorporate numerous features that are useful to manufactures of ultra precision surfaces, including Smart Setup, SmartPSI, and Non-Directional PSD
Smart Setup. The Smart Setup feature eliminates guesswork and the need for high-level training when preparing a part for measurement. The system automatically optimizes the various set up parameters, leading to reliable surface data with only one button press. It is also able to see and measure to sub-nanometer levels, making it ideally suited to super smooth surfaces that lack discernable feature details.
SmartPSI. ZYGO’s SmartPSI technique uses the best of CSI and Phase Shifting Interferometry (PSI) to provide measurements which are both highly precise and speedy, and which are characterized by the lowest possible measurement noise. Integrating automatic calibration and focus during scanning ensures that the data is acquired at perfect focus for each measurement. SmartPSI produces a series of surface measurements in rapid succession which yields optimal results on super smooth surfaces, with surface topography repeatability (noise floor) on the order of 0.06 nm with 0.005 nm rms repeatability in just a few seconds. With more averaging, even smoother surfaces and better repeatability can be achieved.
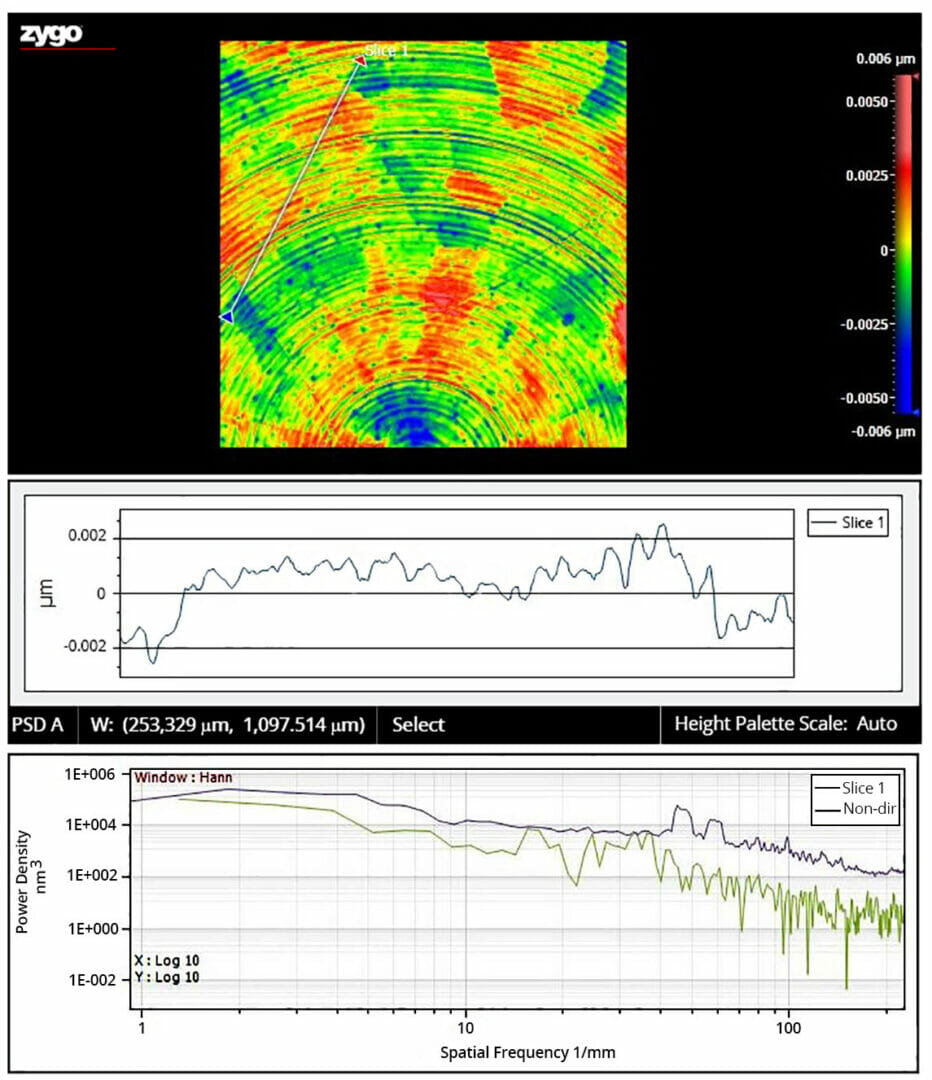
Non-directional PSD. Any 3D optical metrology tool requires simplified data acquisition, but the focus must also be on simplifying intelligent data analysis as well. One tool that enables this analysis is the Power Spectral Density (PSD) plot, which are used to show frequency content in topography maps of surfaces. PSDs are usually created from line profiles, which are easily extracted from a surface map in ZYGO’s built-in control and data analysis software, MxTM. Line profiles, however, are sensitive to alignment and positioning, and if these are done incorrectly, the PSD information can be misleading. With this in mind, ZYGO’s non-directional PSD analysis provides a position insensitive PSD for the entire map, and in this way, it is simple to identify interesting surface structure. (See Figures 1 & 2)
SUMMARY
In general, CSI is characterized by its speed, high resolution, wide measuring range, large measurement area, and is exceptionally versatile for measuring a variety of materials. CSI effectively extends interferometric techniques to surfaces that are complex in terms of roughness, steps, discontinuities, and structure (such as transparent films), additional benefits including the equivalent of an autofocus at every point in the field of view and suppression of spurious interference from scattered light. Zygo Corporation has adopted the CSI technique and optimized it in a new range of advanced tools which can be fully automated with programmed sequences to measure multiple part segments, recipe-based in-tray part measurements, or wide-area part stitching of larger surfaces into a single measurement. User-level logins and recipe configurations also provide confidence that an established metrology routine cannot be inadvertently altered.

